Showing posts with label paperclay. Show all posts
Saturday, November 7, 2015
Thursday, August 6, 2015
Doll making
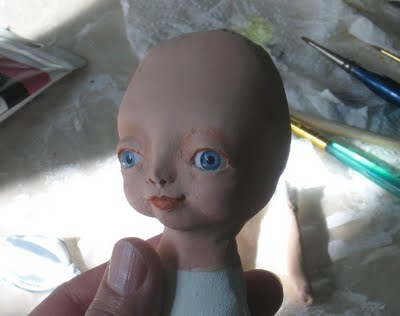
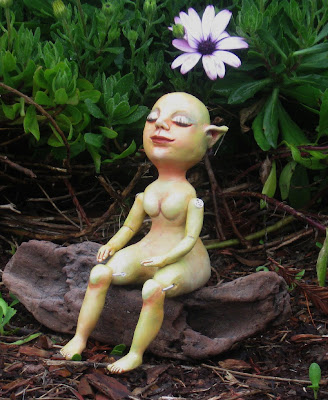
I had to let these little dolls sitting patiently while I got busy with other projects, but they keep me company and I love to see them sitting pretty by my desk on top of a paint jar, that's how tiny they are!.
So, one of them is patiently sitting, waiting for her hair :o)
I have some sweet news for the fall... can't wait to tell you! ♥♥♥
So, one of them is patiently sitting, waiting for her hair :o)

I have some sweet news for the fall... can't wait to tell you! ♥♥♥
Friday, June 5, 2015
Tiny paperclay dolls
I am working on three little dolls, all of them under 3 inches tall:
Aren't they cute?
Aren't they cute?

Monday, January 5, 2015
Giveaway winner......
Carol, (SilverSpring) you won the online class spot! yaay!
Please contact me in private with your email, in case you don't have it public. I will be contacting you with the info and when we start! ♥ Congrats!!
More images HERE
Please contact me in private with your email, in case you don't have it public. I will be contacting you with the info and when we start! ♥ Congrats!!
More images HERE

Friday, September 26, 2014
A link with beautiful doll faces
I love faces. Painting them and sculpting them.
This September I have been running a fun challenge called 29 faces, for everyone interested in perfecting their craft or practicing new things, we all in group fly together and share, cheer and enjoy hundreds and hundreds of faces.
Since I left in the back burner my sculpting, and I have this challenge going on, I have been feeling the "clay itch" again, so before I grab my tools I'd like to share this beautiful link full of doll faces in clay, in their site: (The photo is not mine)
From a Oksana Muratava class in Moscow. HERE
This September I have been running a fun challenge called 29 faces, for everyone interested in perfecting their craft or practicing new things, we all in group fly together and share, cheer and enjoy hundreds and hundreds of faces.
Since I left in the back burner my sculpting, and I have this challenge going on, I have been feeling the "clay itch" again, so before I grab my tools I'd like to share this beautiful link full of doll faces in clay, in their site: (The photo is not mine)

From a Oksana Muratava class in Moscow. HERE
Thursday, July 11, 2013
How to add arms
This is an easy and fun tutorial on how to add arms to a doll.
My model is a fabric doll made by JasmoonButerfly
The arms are paperclay, but they can be polymer as well, just make sure you make some little holes when you are sculpting them.
You need:
-A doll and her limbs with a perforation
-Beads a bit larger than the holes in the limbs.
-Strong thread.
-Large needle.
We start by getting a strong thread or floss. In this case I am using gold acrylic floss, and tiny beads in a color coordinated blue.
Insert needle from the back, pull out from the shoulder area.
Pick up the bead and and push the needle through the doll into the other shoulder. Make sure they are even:
Pick up the other bead, push thread back ion the hole, and insert in the shoulder towards the back again.
Make a good knot and add a bit of glue.
Here she is, all dolled-up.
Thanks for visiting, don't forget to "follow" this blog to be notified of ore tutorials and fun doll pictures!
My model is a fabric doll made by JasmoonButerfly
The arms are paperclay, but they can be polymer as well, just make sure you make some little holes when you are sculpting them.
You need:
-A doll and her limbs with a perforation
-Beads a bit larger than the holes in the limbs.
-Strong thread.
-Large needle.
We start by getting a strong thread or floss. In this case I am using gold acrylic floss, and tiny beads in a color coordinated blue.
Insert needle from the back, pull out from the shoulder area.
Pick up the bead and and push the needle through the doll into the other shoulder. Make sure they are even:
Pick up the other bead, push thread back ion the hole, and insert in the shoulder towards the back again.
Make a good knot and add a bit of glue.
Here she is, all dolled-up.
Thanks for visiting, don't forget to "follow" this blog to be notified of ore tutorials and fun doll pictures!
Thursday, August 18, 2011
Zeb and Calee in Florida
(Text and photos by Moriah Betterly from MLB Studios)
Zeb and Calee arrived on my doorstep and when I opened the box I was smitten. Martha and Lezlei had done a fabulous job on these little cuties and I was dying to work on them. However, they arrived when I had out of town family staying with me so I couldn't do anything with them for awhile. Once I was able to work on them I decided to focus on Calee since Lezlei had done such a fabulous job with Zed. Calee was looking a little bare so I stitched up a green tutu to match her fabulous green boa.
I decided she just had to have black and white striped leggings (because I love them so much myself) so I painted those on with acrylics.
Then I decided she needed some eyelashes and make-up. After all, what circus performer doesn't have make-up? I so wanted to keep adding stuff to her but I had to force myself to stop so the three people after me could work on her too. :(
Zeb and Calee arrived on my doorstep and when I opened the box I was smitten. Martha and Lezlei had done a fabulous job on these little cuties and I was dying to work on them. However, they arrived when I had out of town family staying with me so I couldn't do anything with them for awhile. Once I was able to work on them I decided to focus on Calee since Lezlei had done such a fabulous job with Zed. Calee was looking a little bare so I stitched up a green tutu to match her fabulous green boa.
I decided she just had to have black and white striped leggings (because I love them so much myself) so I painted those on with acrylics.
Then I decided she needed some eyelashes and make-up. After all, what circus performer doesn't have make-up? I so wanted to keep adding stuff to her but I had to force myself to stop so the three people after me could work on her too. :(
Thursday, July 28, 2011
Too hot!
I have not been close to the oven, it is hot enough as it is :o) I have no new polymer sculpts, as I don't really want to leave them raw for a long time. So I guess it will be fall when I go back to it.
I have however, some little paperclay dolls that I need to finish. I had tu put them on the side because of the last school days, then the kids out for summer... then I went back to painting.
But they have been patiently sitting waiting for me. I have the hair, I just need to get the right glue. And selected the fabric too.
I have however, some little paperclay dolls that I need to finish. I had tu put them on the side because of the last school days, then the kids out for summer... then I went back to painting.
But they have been patiently sitting waiting for me. I have the hair, I just need to get the right glue. And selected the fabric too.
Thursday, June 2, 2011
June already!
I can't believe it is June already. The kids will be out for their summer vacation tomorrow. Raise your hands any mom that is ready for that?? LOL
This is a quick recapitulation of my traveling doll team Eager Eagles, from Jenna in Ohio, Jan in Texas and me in California:
![]() |
| Jan's doll as she arrived to my house Keep reading more after the brake line! |
Monday, March 14, 2011
How to add glass eyes
The
first thing was digging out the clay to make room for the new eyes. It
was a scary thing, but this doll is very brave. She was telling me it was
almost like going to a doll Spa:
We measured the eyes in her face and decided that she needed to restructure her cheeks so not to look like a gold fish.
Once she had the cheeks it was imperative to have a new mouth to match and that lead us to a new nose, of course!
The only thing original left in her head, is pretty much her ears!
When the clay was dried, it was time to sand. She said it tickled and kept giggling. With a little bit of more clay and water, all the bits of bumps were soften and sanded again:
Usually I mix oxide red, ochre, white and a bit of purple to make flesh tones, but since more people will work on her, and not everyone is into painting, I decided to use colors really easy to find everywhere.
When the painting is dry I will add a protective varnish, hair and her eyelashes. Will she have black hair? Blond? Brunette? She will decide later, for now she is just relaxing after all the hard work. :o)
After that she will be ready to keep traveling and get to see more places.
Wednesday, February 10, 2010
Photo of my doll
See you soon! :O}
*This is an old post, re-posted from my other blog
Monday, December 21, 2009
How to fix a dol face
How to fix or re-work paperclay doll face / heads:

Before and After picture: Nose bridge softened; cheeks and forehead added to take the bulgy look of the eyes; lips sanded down to a more realistic proportion.
I made this head probably 2 years ago, and left them on the side because I just knew I was doing something terrible, I just didn't know how to fix it. Forward 40+ months and I have learned enough things to see where the mistakes are and how to change it.
This heads will not have the "baby" look I was aiming for at that time. I guess adding enough clay they could look like that, but I want them more for a fantasy looking doll now.
So... Never give up! and Happy Winter solstice! :oD
UPDATE:
Do you want to learn to make a clay doll? I have an online class HERE

Before and After picture: Nose bridge softened; cheeks and forehead added to take the bulgy look of the eyes; lips sanded down to a more realistic proportion.
I made this head probably 2 years ago, and left them on the side because I just knew I was doing something terrible, I just didn't know how to fix it. Forward 40+ months and I have learned enough things to see where the mistakes are and how to change it.
This heads will not have the "baby" look I was aiming for at that time. I guess adding enough clay they could look like that, but I want them more for a fantasy looking doll now.
So... Never give up! and Happy Winter solstice! :oD
UPDATE:
Do you want to learn to make a clay doll? I have an online class HERE
Monday, December 17, 2007
Cordelia paper doll
Ta daaaaaa:There's a great doll event from MRSBO coming this January, on the 31th.
Hhmmm... What is MRSBO? you might ask yourself suspiciously... Well, it is a group that I have been mentioning many times by now if you were really paying attention! (excuse me, that was for my cat, who was only pretending to read here) No, they won't have any tuna either.
And what's the event about?
Well, Mr. Pringle's Society of Feeble Prestidigitators is sponsoring a fund-raiser for the little MRSBO orphan dolls. All members have attempted to conjure up a doll to be sold for charity, but there is something very odd about every one of them!
You have to search MRSBO that day to see what each artist of our group came up with!
Want to take a pick at what I will be presenting for auction?
This is Cordelia.

She heard something about The Orphanage having some dolls, and she took the long walk to go there and get herself one.
You'll have to excuse us here. Cordelia is still bald, undressed and doll-less, but we are working on those matters.
UPDATE:
Do you want to learn to make a clay doll? I have an online class HERE
Hhmmm... What is MRSBO? you might ask yourself suspiciously... Well, it is a group that I have been mentioning many times by now if you were really paying attention! (excuse me, that was for my cat, who was only pretending to read here) No, they won't have any tuna either.
And what's the event about?
Well, Mr. Pringle's Society of Feeble Prestidigitators is sponsoring a fund-raiser for the little MRSBO orphan dolls. All members have attempted to conjure up a doll to be sold for charity, but there is something very odd about every one of them!
You have to search MRSBO that day to see what each artist of our group came up with!
Want to take a pick at what I will be presenting for auction?
This is Cordelia.
She heard something about The Orphanage having some dolls, and she took the long walk to go there and get herself one.
UPDATE:
Do you want to learn to make a clay doll? I have an online class HERE
Wednesday, November 14, 2007
My first finished clay doll back in 2007
I want to share with you something. As shown in the original post HERE, Lavender was my first doll finished. I made many other doll parts until I more or less got it, and I was so happy that I made a video too, which was also a lot of fun. This little doll lives in Germany. I was part of a group for misbehaving orphaned dolls called Mrs. Blathersby. I understand they closed down her business because she was misbehaving herself...? ;oP
First it was just clay and aluminum foil:
Then a funny shape:

Then a humanoind form, painted with acrylics:

All the parts attached:
Thanks for visiting!
![]() |
| Lavender's Story |
First it was just clay and aluminum foil:


Then a humanoind form, painted with acrylics:

All the parts attached:
Some details of the boney knees and feet:
Thanks for visiting!
Subscribe to:
Posts (Atom)